Well. I've really done it this time haven't I.
It's been over nine weeks since my last cinematic post.
My bad.
I don't really know how this happened.
oops
That said I have been working rather studiously, so studiously that I haven't really even been able to think about posting. I suppose we'll see whether or not I actually manage to cover all of that work in this post.
But I can try, so here goes.
Back when I last posted I showed off what I was doing with 3D, which looking back was just so ridiculously long ago. I got a tutorial from the main man Jerwin for human body modeling, and a couple days later I had this.

It was cool having a tutorial that showed me some good topology techniques for human anatomy and it was designed to deform well in animation. I also learned how to make better use of some tools that I hadn't really done much with before.
The next step was modeling Oscar's head. Originally we planned to cover up the 3D model with the particle and smoke simulations, but after the sim tests that I did (see the last post) I realised that the model would probably be pretty visible, so I decided it would be best to try to make the model actually look like Oscar. To do this I asked him for a couple photos of his face to put into Maya, and this is what he gave me.
The photos were taken at arms length and I knew this would warp the proportions of his face a bit but I figured it wouldn't be too bad. I grabbed a tutorial from Pluralsight for modeling the human head and went to work. Once again a couple days later I had this.

The topology was nice, again it was good to have that tutorial showing good topology for animation. But as I mentioned earlier the head was pretty warped. I tried to correct things a little but the forhead was too broad and the lips were too big and it was all just kinda wrong which I knew I'd have to fix eventually.
While I was doing all of this we finished our storyboard, or the first version of it anyway, and that meant it was my turn to take that and turn it into an animatic.
Here's what I had to work with, given to me by Tea.


Then Oscar provided a sound file and I was also told that the glow on the character should be gold, not blue. So here's what I made.
Which everyone was happy with at the time. We knew that the spirit world was too vague, but that was okay for the time being, we'd figure it out eventually.
Since the animatic was done it was time to film. We all headed round to Oscar's place with my camera, set up in his Dad's room and started filming. I acted as camera man with Oscar as the actor and Tea, Jo, and Adrian helping set up lighting and figure out shots. I put my camera on a kitchen tray for a little stabilization. We checked out the footage and realised that my camera wasn't getting the results we wanted, so Oscar biked in to school, got one of their cameras, biked back and we started shooting again. This time the footage looked awesome so we wrapped up. Here are some photos ( mostly from Tea's blog) of the wonderful event.


Good times with the crew.
After our first break we realised that we really needed to sort out the spirit world shots so Tea worked on some new storyboards and I started some new animatic. I used the backgrounds and large creature that Adrian was working on and the smaller creature that Jo was working on, and I went from there. I had to paint a few assets in photoshop, just the Oscar spirit and the low angle shot of the tree, and then I put it all into after effects and made the camera moves and compositing and effects, etc.
It still didn't really have an ending but it was getting closer. We had a group progress report and were told that we needed to sort out the spirit world better so we all sat down and discussed it, I sketched the ideas into a quick storyboard

which Tea took away and started to refine into this


Which looked waaaay better. Sooo, once again I was tasked with updating the animatic.
Here's the first version, still missing most of the end.
And then Keat helped us think of a couple other possible shot compositions to make things more interesting. I jumped into photoshop and did some new elements for the animatic like this here.

I also blocked out some rough movement for the creature etc etc, and created this.
It was getting a lot close to the sort of thing we were aiming for but not quite. Tea came up with a couple other shot ideas and I put in all of our footage, then we had this.
Which was almost there! The team was pretty happy with it, even Dane liked it, but Keat wanted it to go further, so since at this point I'd gone multiple nights without sleep and still had a tonne of 3D to do, Keat split up the shots between Jo, Tea, and Adrian to polish up and put into the animatic while moved on, and here's what the came up with. (you'll have to forgive the echoing sound, I didn't composite this one but I think two versions were overlaid and they forgot to mute one)
I have to say it hurts a little to see weeks of work largely overwritten, but I think the layout looks better for it. In the end we managed to come up with the shot compositions as a team and shared the work around more and I think it's cool that all of our voices and styles are coming across in the film.
So after all of that it was back into 3D for me. There was still a lot to do.
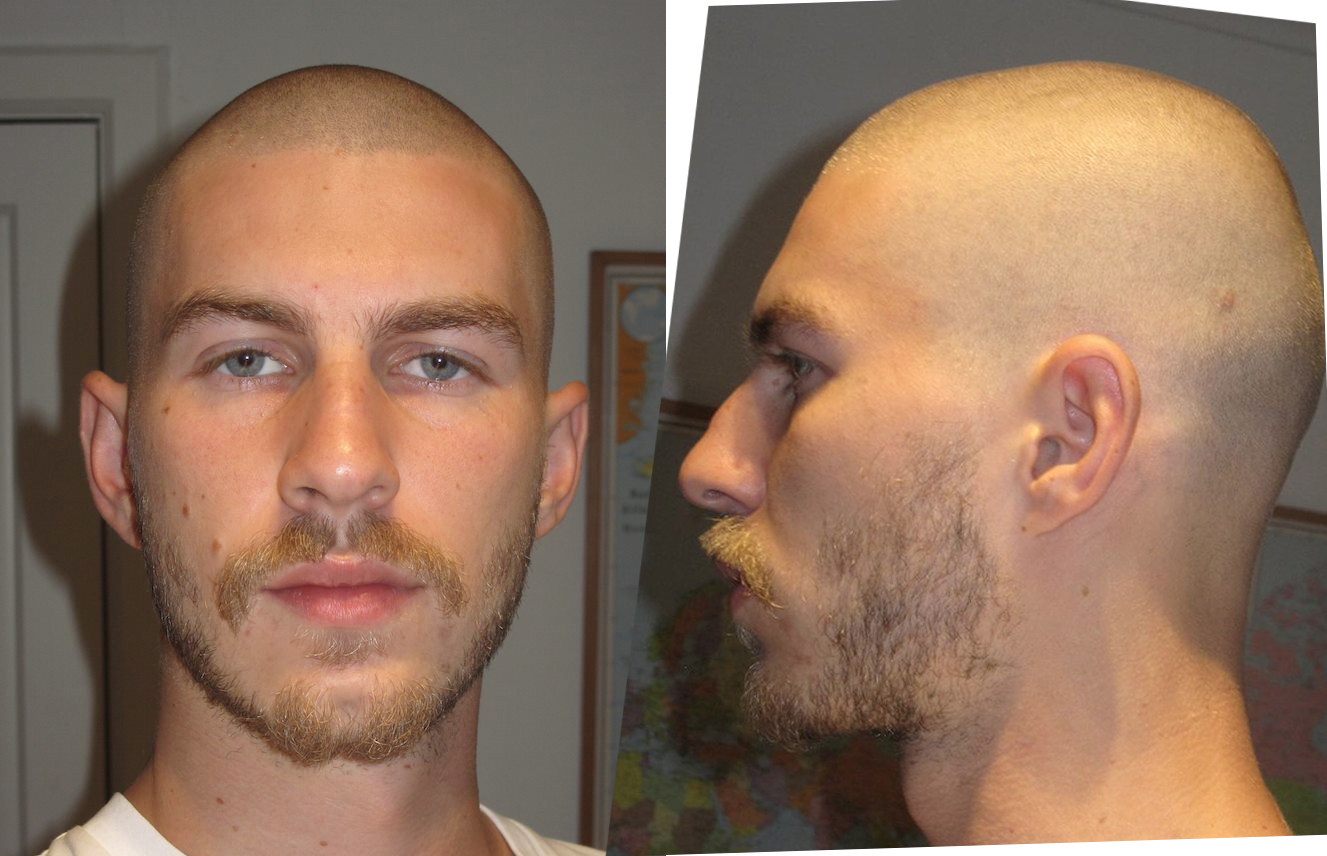
The face was still warped and I decided the first thing to do was fix it, so at school Oscar and I grabbed a camera and tripod and took some nicer reference photos.


And if I dare say so myself, looks quite a bit like Oscar, but it gets even eerier when you add hair and a stache.

Those are just extra objects I made to stand in until I got some actual hair sim going.
Next I did a quick UV map using the automatic mapping option in maya and cleaned up a couple areas (id din't have to be nice since my textures are all proceedurally generated in Maya) and applied the texture from my sim tests. I also checked out some hair simulation tutorials and replaced the hair objects with actual maya hair. Then I did a turntable, so lets check that out shall we?
Again it's kinda eerie. I still need to make his beard but I'll get round to that eventually.
Next it was time to rig the thing. Otherwise known as hell.
I had yet more tutorials to check out for this. One for basic rigging and skinning, the other for muscles.
First I made a basic bone setup.

Then I had to make some weight paint it.

Then I tried moving it, but I found that even though the deformations were smooth, there was some collapsing around the shoulders and legs.

So I decided to try my hand at a muscle rig. My freaking mistake. I Found a muscle tutorial and set about it. I did a quick test to figure out how muscle worked.

And I was like yeh I get it. ONWARDS TO GLORY!!
It took a few tries, and about a week, and honestly I can't be bothered looking through it all for progress pictures, but here's what I ended up with.

Which looks cool right? I turned all of my joints into muscle bones, built rib and pelvis deformers from nurbs objects, had to rewight the bones to the skin (there's a tool to do it automatically but it didn't work for me, the first sign of the horrible events to follow.) then built the muscles, sculpted their squash and stretch poses, mirrored those poses maually, and checked that they all moved the way I waqnted them to. It all looked like it was going so well, but when I went to bind the muscles to the skin...

Apparently I did some stuff wrong, and got shoulders McGee. When I add the muscles it assume that they already have a pose and then I paint the weight and hell breaks loose. Too bad so sad. And thus I abandoned the muscle rig after many failures and many sleepless nights spent working and crying. And so life goes.
So I went back to my original muscleless rig. I figued if I was subtle enough with my animation then there wouldn't be any collapsing. I just can't lift the arms or legs too high. Otherwise the deformations are all acceptable. It's just too bad that I won't be quite so free when I animate.
Then I built the controls, that didn't take too long, just some nurbs curves and constraints.

Blammo. Then I did the rig test.
It's a bit short but I think the movement matches the kind of thing that'll be in the final film so I'm happy that the rig should be sufficient.
So that's pretty much everything. There's probably a bunch of little bits and pieces that I did to figure this stuff out, various scribblings in books and such. All the stuff that would be on here if I just updated as often as I'm meant to. As I said I've just been working too hard to even think about blogging. It's been intense. Next up, blocking out the actual shots in 3D and then animating. Then I can get to simulation and rendering. Should be very interesting indeed.
I'll try be at least a bit more onto it with these blogs, so hopefully I'll be back soon with more.
Untill then, stay healthy, and sleep more than I do.
L8rs m8.