Hi I'm Hamish. This is a documentation of my wonderful adventures as I make my way from a flailing animation student, to a powerful and successful art ninja (I hope.) I'll be posting my work from Animation College NZ fairly regularly (at least that's the plan) as well as my own personal work. So hold onto your socks or they may get blown off. If you like what you see, good for you. Hopefully there'll be more soon enough.
By the way here's some shameless self advertising. Deviantart Portfolio (basically the same stuff but whatevs) Youtube
So for this assessment I haven't done a single blog post, this is largely because when I've been at school we've had exercises to work on, and then back at my apartment I don't have internet. But I have been doing some research and work on the assessment so I'll try to post as much of my process as I can.
First of all I considered a few possibilities for what discipline I could use. I considered Engineer, Teacher, Programmer, Electrician, and Acrobat. From those options I narrowed it down to either Engineer or Teacher.
Then I started to think about how I could translate some of their process into animation. I made a little chart to help out with that.
Dane said that presently the teaching idea was more interesting because the Engineer's process was very similar to the typical design process, but if I looked into engineering more it could have some interesting possibilities as well. He also said that I should refine the idea down from just 'engineer' to one of the sub-categories of engineering. I decided that it would be most interesting to look inti mechanical engineering.
I looked at what processes mechanical engineers use to design something and found the 'Engineering design process' which is the commonly accepted process by which engineers work.
The process goes like this:
Research
Conceptualization
Feasibility assessment
Establishing design requirements
Preliminary design
Detailed design
Production planning
Tool design
Those final two steps only apply to mass production, and since I won't be mass producing my animation I don't think I'll focus on that at all.
The rest of the process however should work for me, though parts of it have more to do with writing the actual brief than making the animation. So I decided that I would need more to go on than just the engineering design process.
Next I looked at how engineers tend to work. Traditionally engineers work in a very physical and tactile way. They build prototypes and models and they can see and feel whether or not it will work. They also have a very iterative process. They build a prototype, and adjust and change pieces, solving problems as they encounter them. Presently they also work a lot with computers for designing and previsualising concepts. This is called computer aided design, and largely focuses on 'solid modeling.' Solid modeling is different to normal 3D modeling as it focuses on realistic physical objects in a virtual space that can be simulated.
Mechanical engineers need to have a solid understanding of mechanics, kinematics, thermodynamics, material science, structure, and electricity. For the type of work I want to create I think it would make sense to focus on mechanics and kinematics.
Engineering also requires precision. Using measurements of scale weight and force.
Based on all of this information I came up with the idea to create my animation physically using stop motion. I would build an iterative animation by animating individual elements that each had their own 'physical properties,'
For instance I may animate using some blue clay that had water-like properties, or with an object that could switch gavity. The properties of the objects would not have to match real world properties, they would just have to remain consistent throughout the iterations of animation.
I would then start to build the iterations of animation using theses elements with a Rube Goldberg style creation. Each element would react with the others to create something bigger.
I could use a computer to plan out some of these interactions but I want as much of the animation to take place in camera as possible.
I think that this idea works well as a way to encapsulate the ideas of Mechanical engineering. The process has the physicality and haptic feedback that engineers tend to work with, as well as making use of iterative design. The animation will require an understanding of physics and careful consideration of the forces in play. There is room for computer aided design and I will also have the opportunity to consider precision with the measurements of movement.
I think that to keep the animation from becoming too ridiculously complex I should aim to create 10-15 unique elements that will interact, and create 20-25 iterations of animation before creating the final piece.
And here is the brief.
There were a couple of previous versions but I saved over them so I don't really have them to show. But whatevs I guess.
So apparently there was a bit of misunderstanding throughout the class as to exactly what the point of these class exercises was, and now it has been cleared up that they were intended to be included in our notes as part of the main assessment. This means that all of them needed to be complete, and as far as I understand, there should be some notation as to the thinking process involved in creating them. So I am going to repost all of the completed exercises here along with some notation.
Exercise 1:
The first exercise was about perceiving. In class we discussed synesthesia, or the crossing/merging of senses in someones brain. Some people can hear colours or see music, others can taste names or feel smells. Our task was to create an animated visual representation of what something tastes like.
We were also told to avoid symbolism, if something tasted like strawberry we shouldn't animate a strawberry.
I chose a green tea poke stick as my food to animate. Initially I started taking notes on the flavour, intending to create elements in the animation that would represent flavours and textures intermingling in the order that I experienced them.
Dane told me that this approach was too academic. Instead of translating taste into visuals, I was translating taste into language, and then that language into visuals. He suggested that I should try to directly draw what I tasted. So that's what I did. I drew out a series of shapes that I felt represented the flavours. I considered when the shapes should be sharper or softer, simple or complex, etc.
This is what I ended up with.
I feel like this representation works well enough. I think that with more time I could have explored synesthesia more in depth. I found that it was difficult to imagine a flavour visually without creating some sort of rule set for the translation of that experience. For instance, more tangy flavours will be sharper shapes, sweet will be softer, weak flavour is a small shape, strong is larger, etc. These are the sort of rules that I automatically went to. And this is somewhat how synesthesia works in real people too. The brain doesn't randomly decide on how to translate the stimulus, it is trying to make things make sense so it consistently translates the stimulus.
Attempting to break free of those rules could result in something more interesting, but at the same time the result would be less recognisable as the original taste. to some degree that would feel like I had failed the task.
Exercise 2:
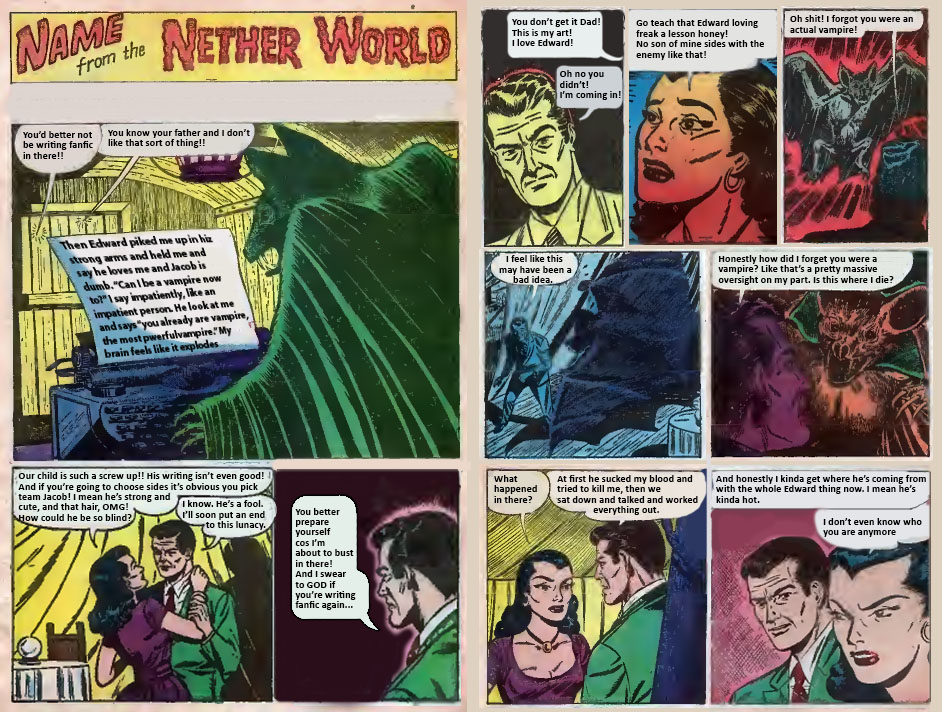
The second exercise was about 'deep play.'Deep play is all about breaking creative boundaries, seeing the world in a different way, and attempting the unexpected. The task we were gi\ven was to remix a comic strip. Remixing is taking something that exists and changing something about it, thereby changing its meaning. The comic could be changed any way we wanted, changing text, moving panels, adding characters etc.
This is the comic strip I chose:
And this is what I created with it:
I thought that what I created was pretty fun and it definitely changed the meaning of the original. It plays with the order of events, changes who characters are and their relationships to each other, and completely changes the tone of the comic.
That said, even though this is a reasonable example of remixing, I feel it falls a little short of the possibilities of deep play. I don't feel like this comic really breaks any boundaries or explores creative possibilities in new or strange ways. I believe deep play is possible using a comic for a medium, though I find it difficult to think of how to fully realise deep play entirely through remix.
Exercise 3:
This exercise was about patterning. This is the practice of finding patterns and order in seemingly arbitrary information. This is like how we look at clouds and see faces, puppies, and a weird looking shark dude with a trident. In this case we were looking at a video of some bubbles in water and trying to see animation principles.
We were given this video:
First I turned it into this:
And then into this:
Exercise 4:
Exercise 4 was about embodied thinking. Embodied thinking is about using kinesthetic thinking and empathy to embody a subject. This may mean to put yourself in the place of your character to better understand what they are thinking and feeling. Our task was to take a description of a memory from a class mate and turn it into a short embodied animation, in which we should attempt to feel as they did and then represent those feeling visually.
This is the memory brief I received from Michael:
And this is what I animated:
I think I did an alright job of this. I didn't realise until after completing the animation that it said bare feet, my bad. Otherwise I considered the energy and warmth of the memory. I trued to capture the feeling of nostalgia, as well as feeling the movement that was described.
I didn't find it too hard to empathise and embody the memory that Michael gave me, though I think that some of the feeling is missing thanks to the time restraints of the animation itself. I considered pushing this into a more surreal direction by considering smell and feel more in a synesthetic manner, but I think that this captures the ambience if the memory a little better. Exersize 5:
This exercise was about modelling, which is to represent something and its nature in a different, sort of metaphorical way. An example is creating a visual representation of data, or creating a miniature model of a building before building the actual thing. This also included representing 3D space in a tD drawing, this is taking a concept or dimension and representing it in another manner.
Our task was to represent all of time up to this point in a visual way.
This is what I created:
For this task I considered different theoretical models of time and decided to create an image based on the branching paths model. My image represents the idea that different decisions lead to different possible timelines that all move linearly alongside each other. We sit on the 'event horizon' where future possibilities momentarily become present and then transition to past. I have also shown time 'shattering' as it moves past that event horizon, which means that the past does not exist. Once we have moved through it, that time is no longer accessible and is essentially erased.
I'm fairly happy with this image and I think it works for the task. It takes the concept of time and represents it visually.
Exercise 6:
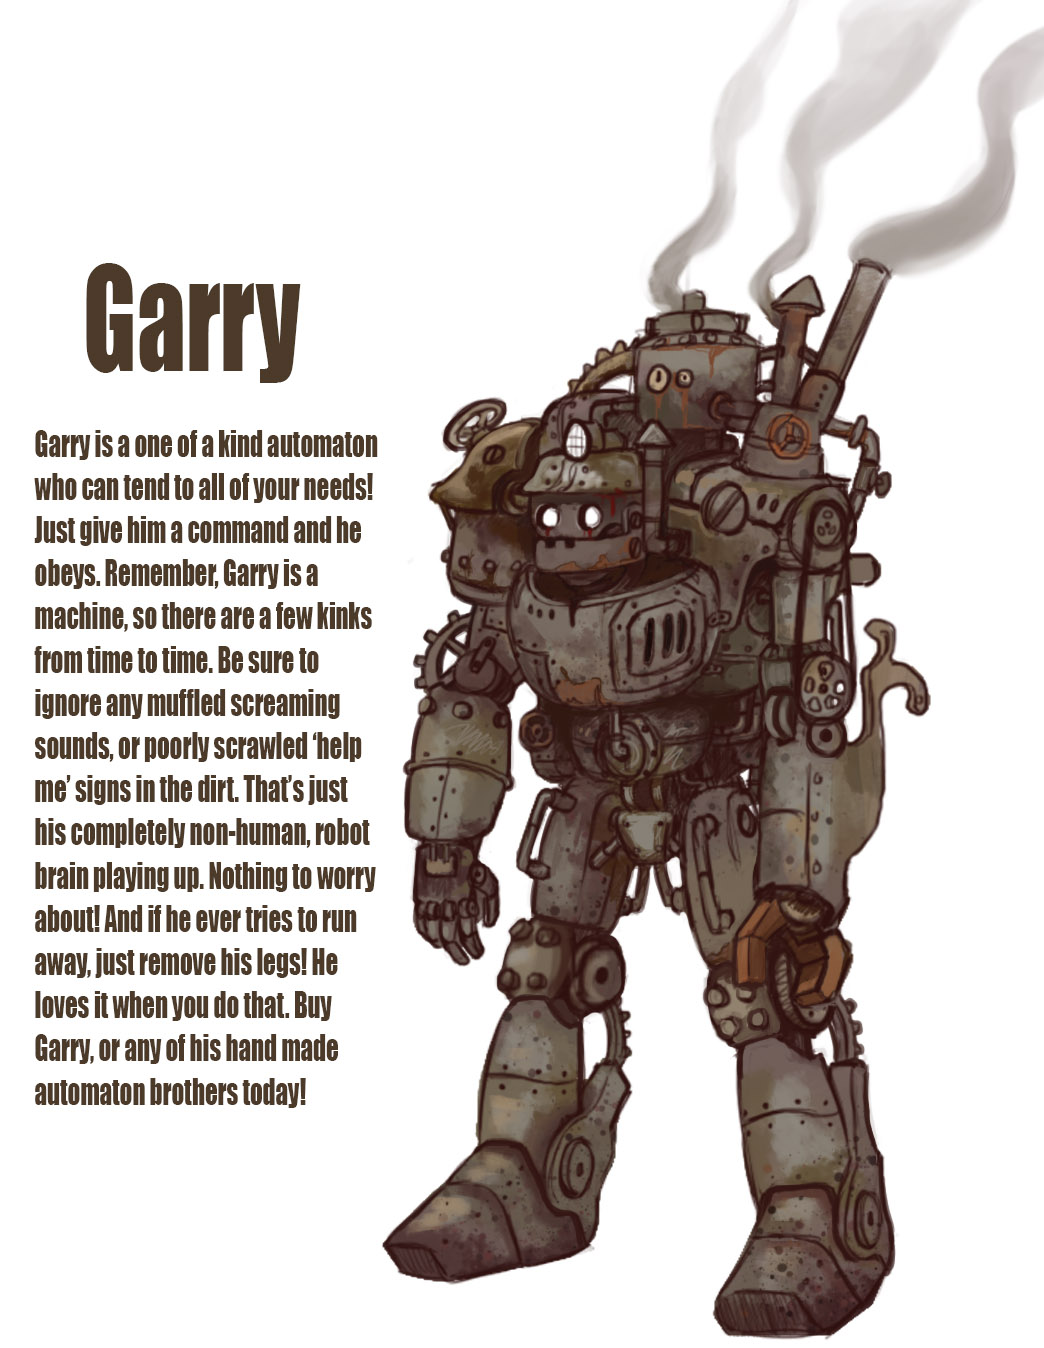
This exercise was about Abstracting. Abstracting is creating an analogy between two things in a way that takes a complex idea and simplifies if through its similarities to another thing. An example of this is pokemon that represent elements through their designs.
Our task was to take our second discipline that we have chosen for the main assessment, and to abstract it by creating a creature that represents the ideas involved in that discipline.
This is the creature that I designed:
My chosen discipline is mechanical engineering, so I created Enginero. I feel like a lot of the design is sort of the most obvious choice and a little bit typical, but at the same time I managed to include some pretty cool aspects of mechanical engineering and mechanical engineers themselves. Engineero is holing a raspberry pie, a raspberry pi is a type of mini computer that is popular among makers and engineers when building prototypes and proof of concepts. On the oposite side he had a 3D printer which is used in rapid prototyping, he also has a small plasma cutter, which is used for both prototyping and final builds. Of course I made him mechanical, with tank tracks and a monitor for a face. I also made him look a little sleep deprived (this is fairly common for engineers and engineering students)
I feel this character encapsulates mechanical engineering fairly well, and does a good job of simplifying the discipline into an easy to understand character.
Exersize 6.5:
This wasn't really one of the transdisciplinary exercises but we still did it as a class so I'll include it here. This exercise was creating an animation that transitioned from a frame that I created, into a frame that a classmate created. At the end all of the animations will transition into each other creating a constantly morphing shape shifting animation. It is a similar idea to the exquisite corpse exersize, where each person draws one third of a creature, then folds the paper and hands it to the next person, creating a freakish final image.
Here is my frame:
and here is Gabby's frame which I transitioned into:
And here is the transition which I created:
I quite like the animation I did for this exercise. I ended up doing three transitions in my animation rather than just one, just because I was enjoying doing the animation. But even inside of this animation on its own I think there are some transdiciplinary thinking skills coming through already. Exercise 7:
This exercise was about synthesizing. This is taking tow ways of thinking and merging them to create something new. Our task was to take the ideas from two previous exercises and to merge them to create a visual artefact that shows what society looks like when it is working at its best.
In the end I just didn't get this exercise done. This is partly due to time constraints, there was a lot to get done in this last week and another exercise on top of that was pushing it a little, and also due to a wrist injury flaring up and making it increasingly difficult to draw. I sprained my right wrist quite badly a couple of years ago and that has weakened it somewhat. Without my wrist brace which is currently in Palmerston, drawing for more than a few minutes can become quite painful.
So this one's not getting done. Too bad I guess
And that's all of them. Lots of little exercises to gain some understanding of Transdisciplinary thinking.
Cool beans
So we've formed groups and started doing game design. I've got a pretty solid team so I'm stoked.
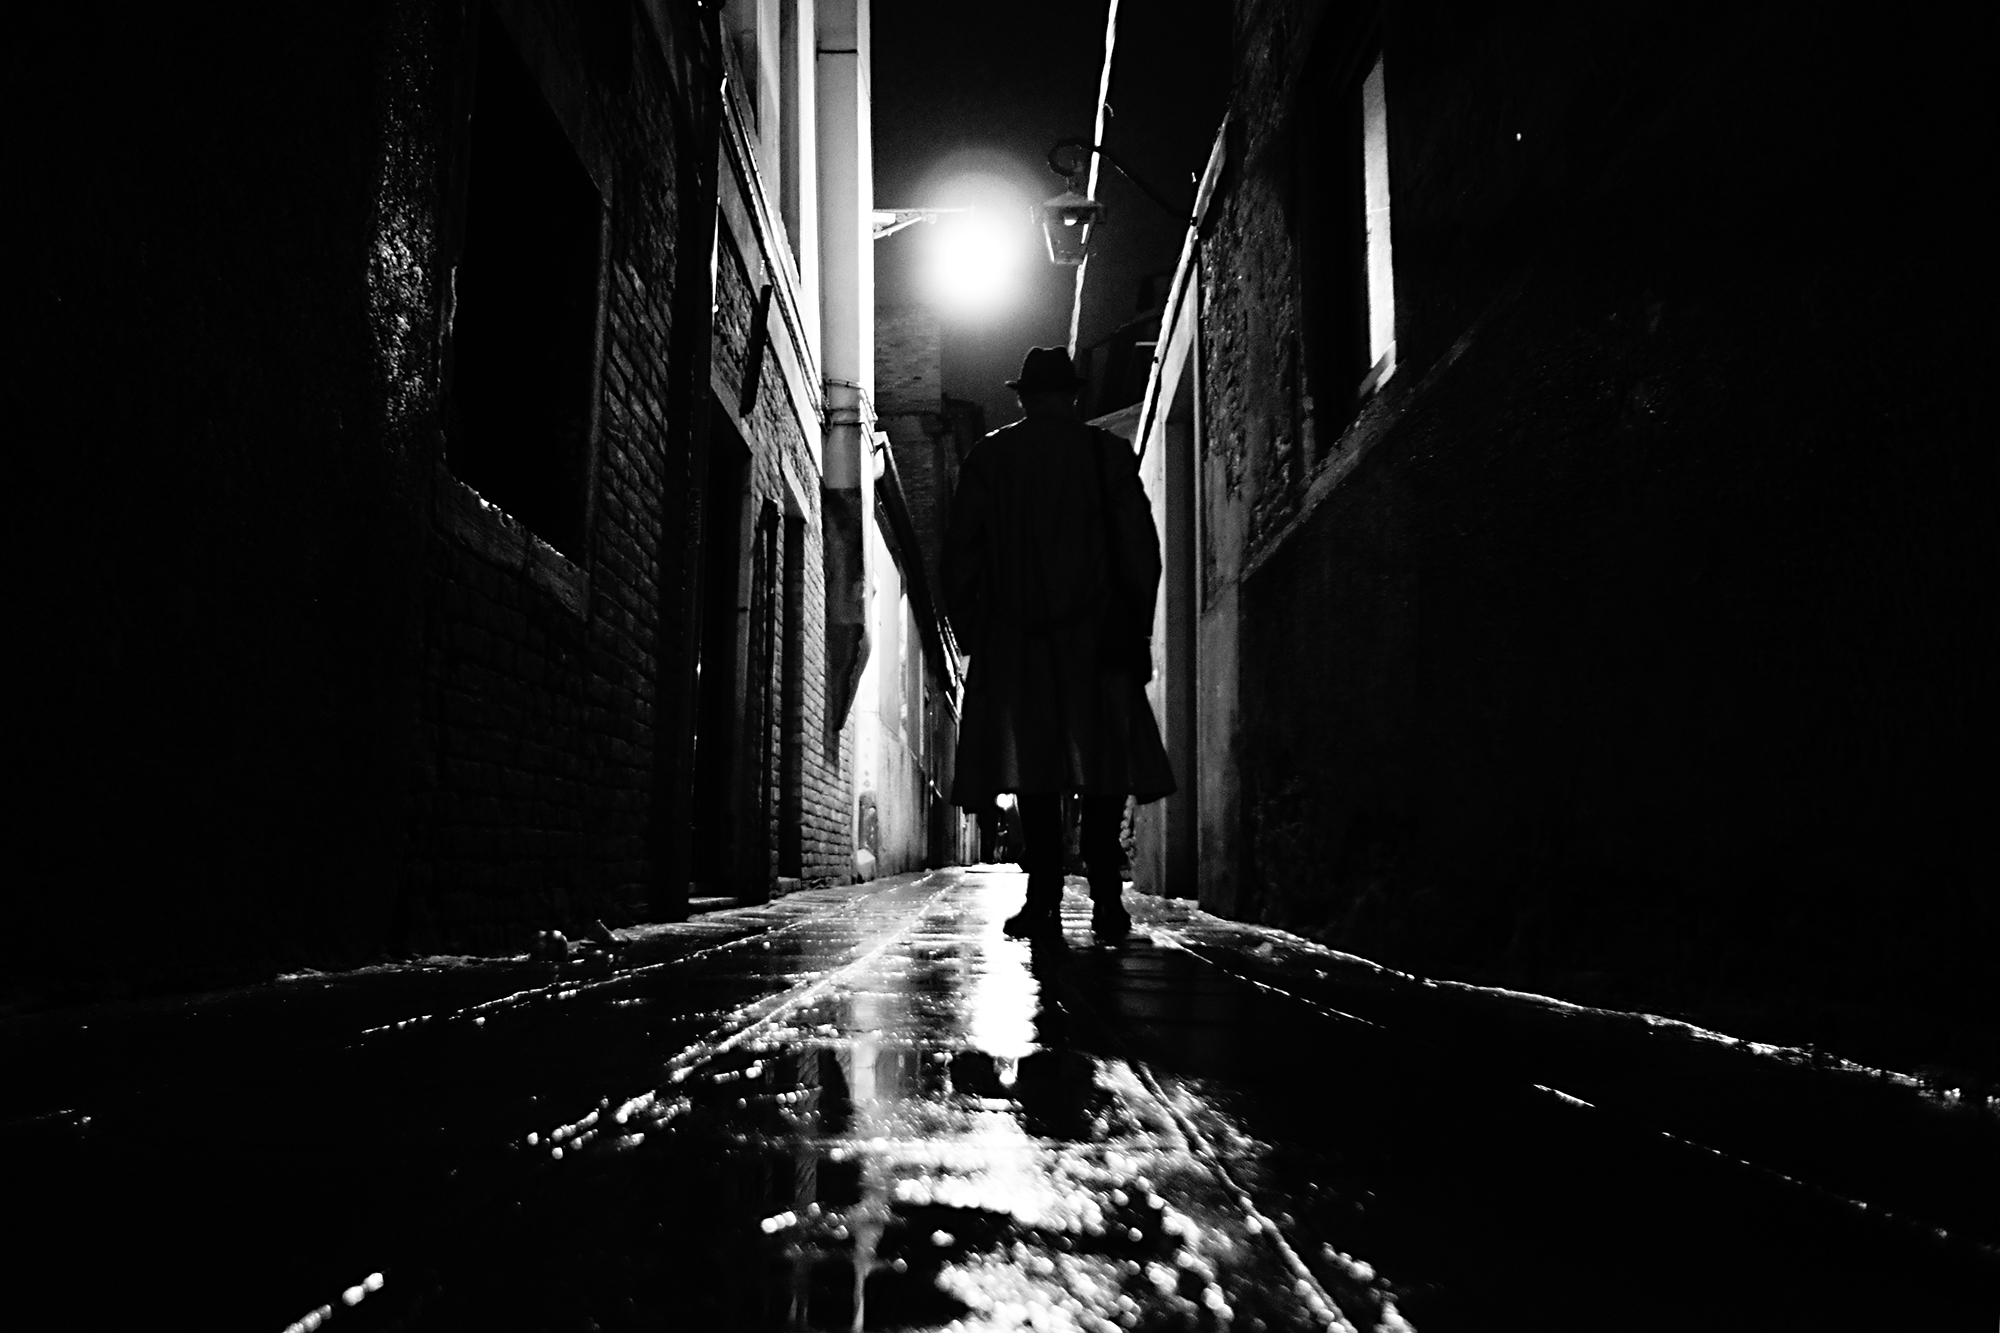
Jerwin proposed the idea of doing a Neon Noir game and we all decided to run with it.
So far our ideas are leaning towards a 50s style Noir story set in a dystopian future.
The art style will incorporate elements from 30s art deco, as well as 50s Noir lighting, and 80s neon and cyberpunk.
It's a very broad spectrum of sources but I think they all gell quite well together under the title of Neon-Noir.
Well since the 23rd of may, when I last posted, a lot has happened. Most notably, just over a month has passed without me updating this blog, and also my group and I have finished our short film.
So uh, my bad again. Clearly I'm not very good at this whole regular updating thing. But now there's a lot to put up here so I suppose I should get to it.
At the end of my last post I had just created a rig test, which meant it was time to animate.
First I played around with matching cameras between After effects and Maya. I found methods to export a Maya camera to AE and vice versa, and I found that it was much easier to make the camera move in After Effects and then bring it over to Maya for animating than the other way around. This way I could see the whole scene moving with the camera rather than just the character.
I used an AE script called 'AE3D Export' created by Ryan Gilmore which allows you to select your AE camera and some 3D objects and export them to a maya scene. Then I imported my character and also created an image reference plane showing the moving background so that I could see the character in the scene through the maya camera.
I did this for the 3 shots containing 3D that had complex camera moves. There were two other shots which included the 3D character but had no camera move so I didn't bother with a camera export for those shots.
Once I had all of the Maya scenes ready I went about animating.
This wasn't a particularly difficult piece of animation, though it did take me a little while to wrap my head around the idea of subtle realistic movement. Since Oscar is a real person, not some over the top animated character I wanted to make his animation realistic. I had to figure out what kind of subtle movements he would make even when he wasn't really 'doing anything.' I also had to consider the forces acting on his body, he isn't standing on anything so obviously something is making him float/fly. I decided to treat it as if he was under water, this meant that he was being held up by his chest/torso, and his limbs could just sort of float around on their own. IK was great for this. I was able to move around the model's core control without the feet or hands changing position which made for some fairly convincing movements. I also wanted to consider individual poses, much like you would in 2D. When thinking about movement it is easy to forget about silhouette and pose. I liked the poses in our animatic so I wanted to stay somewhat true to them. So I started with key poses, letting the program in-between them however it wanted.
Then I started tweaking movements. I wanted movements that flowed through his body in an elegant, almost dance-like way. To do this I staggered key frames, for instance I would have a key for the pelvis, and 5 frames later a key for the lower back, 5 frames later one for the rib cage, then the neck, then the head. This way you could see a movement flow up the spine. I used this technique for the arms and legs as well. I also attempted to make use of the 12 animation principles. Mostly I focused on anticipation, follow through, and slow in/slow out.
Of the 5 shots the first two were the most complex. They were close up and demanded more precise animation. The latter 3 were long shots and had fairly simple movements so these were much easier and faster to animate. Then I rendered out the final animation for each shot with the textures.
After animation I moved on to simulation. I had done tests right at the beginning of the year so I generally knew what I was doing. I decided that I should do a two pass effect. One pass of voxel based smoke, and one of simulated particles. I made a 3D container for the smoke and set my character mesh as the emitter. I had a lot of settings to play around with and it took me about 3 days to work out the right look. I used a turbulence field and a wind field to get the smoke moving the way I wanted it to. I turned my settings on the smoke and the fields into presets and then copied them to each other shot.
Next I baked each of the simulations so that they would render faster, and set them up to render. To speed up the process I rendered on about 7 computers at school.
When the renders were done I went to start compositing them I discovered that each shot had something wrong that would require me to re-simulate and re-render all of them. In most shots the smoke was moving too fast, and in others it was moving in an undesirable direction or shape. So I tweaked all of them and re-rendered. In hindsight I should have done more test renders/playblasts before going to the final render in the first place.
Once those renders were done I was ready to do the particle simulations. This process was almost identical to the smoke process. I set up a particle node and set my mesh as an emitter, tweaked settings and fields for a day or two, then baked and simulated. This time I did playblasts along the way. Since I was only simulating about 500 particles at a time is was a lot easier on my machine than the smoke had been, so test renders weren't too difficult. Then I render-farmed again at school and the effect simulation was complete.
Next up was compositing and effects. This ended up being one of the longest processes for me. Compositing can be relatively quick if you're just putting and animation on top of a video or something like that, but I was essentially creating the entire world in compositing using the elements that had been built by myself and the team. I spent a very long time adjusting colours, blend modes, movements, timing, camera moves, effects, and lots and lots of tweaking for every shot. For the character effects alone I used 20 After Effects layers per shot to get the look that I wanted.
Here's a quick video of how that looks in action
I'd say that compositing alone probably took me at least 80 hours of work time, though I should mention I'm pretty terrible at estimating time. In the end I had rendered out between 4 and 8 versions of each shot, that was 54 videos all together not including all the test shots and versions of the whole short film. During this process I even had to do some flash animation for the creeping light effect (though it was pretty janky since I had to rush it to get everything done) because my camera tracking wasn't working for the originally intended 3D effect we had planned on using, and I figured flash would be faster than a rotoscope effect. I should mention that every effect in this short film was done by me. I did the shot smoothing on the live action footage, I did the eye opening effect (Oscar did the 2D animation of it opening, and then I did all the compositing) and the space fly through, all of the effects on the jellyfish, glow effects, particle effects, I made all the space backgrounds using Hubble photos, colour corrections, glitch effects, shaky effects on the creepy shots. All of it. The only effect-like bits I didn't touch were the title and credits, which were done by Oscar. I was meant to do new glitch effects on the credits but I completely ran out of time. So it was a lot of work to complete.
OH! and the phone effects. I did all those too.
I found a free 3D model of the Galaxy S5 phone, edited it a whole bunch to make it not look so janky, textured it and rendered it to match the shots, then I made a phone screen in Photoshop that matched the original screen on the footage, did some animations on it in after effects, composited that all together in the shots and added glow effects to the screen. I'd forgotten all about that hahaha.
Next I took all of those videos over to Premiere Pro to edit together. This didn't take too long. I just had to drag and drop videos over top of our animatic and add the new sound that Oscar had made and I was done.
So here's the final film. :D
In the end I had to hand the project in almost a week late, which I wasn't at all happy about, but It would have been practically impossible to get it in on time with the amount of work I ended up having to do for compositing. In hindsight I could have dealt more of that work out to other members of the team and also managed my own time a little better, but they were all working hard on their portions of this project and on other school work so I was reluctant to give them more. Also I just wasn't used to this amount of work myself. So while I possibly could have worked a little harder to get it in on time, I already felt fairly overworked and pushing myself harder didn't entirely feel like an option. In any case it got done and I think on the whole it looks really cool, though there are still things I'd like to fix up at some point.
So that's it. A semester of work surmised in a single one and a half minute video. Cool beans.
It's been over nine weeks since my last cinematic post.
My bad.
I don't really know how this happened.
oops
That said I have been working rather studiously, so studiously that I haven't really even been able to think about posting. I suppose we'll see whether or not I actually manage to cover all of that work in this post.
But I can try, so here goes.
Back when I last posted I showed off what I was doing with 3D, which looking back was just so ridiculously long ago. I got a tutorial from the main man Jerwin for human body modeling, and a couple days later I had this.
It was cool having a tutorial that showed me some good topology techniques for human anatomy and it was designed to deform well in animation. I also learned how to make better use of some tools that I hadn't really done much with before.
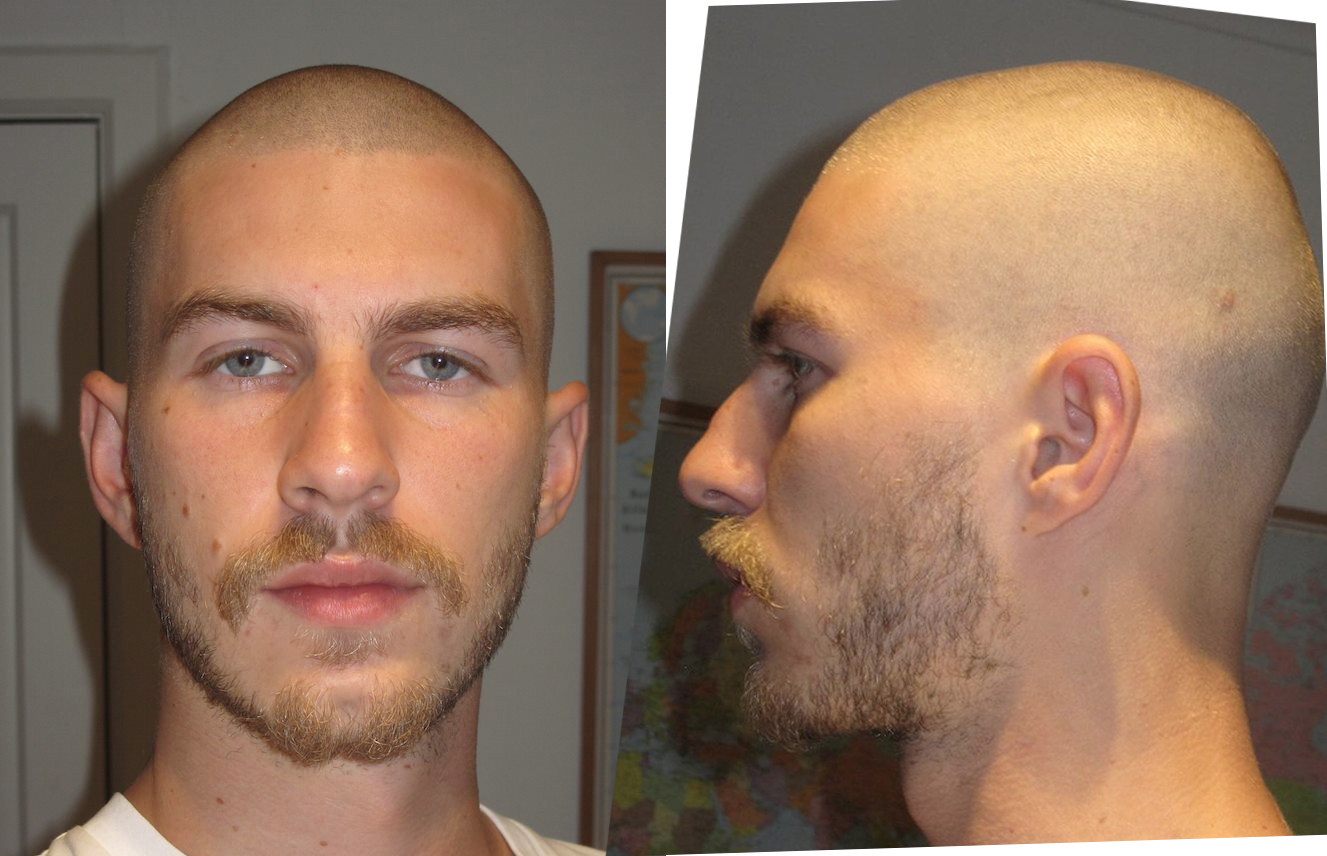
The next step was modeling Oscar's head. Originally we planned to cover up the 3D model with the particle and smoke simulations, but after the sim tests that I did (see the last post) I realised that the model would probably be pretty visible, so I decided it would be best to try to make the model actually look like Oscar. To do this I asked him for a couple photos of his face to put into Maya, and this is what he gave me.
The photos were taken at arms length and I knew this would warp the proportions of his face a bit but I figured it wouldn't be too bad. I grabbed a tutorial from Pluralsight for modeling the human head and went to work. Once again a couple days later I had this.
The topology was nice, again it was good to have that tutorial showing good topology for animation. But as I mentioned earlier the head was pretty warped. I tried to correct things a little but the forhead was too broad and the lips were too big and it was all just kinda wrong which I knew I'd have to fix eventually.
While I was doing all of this we finished our storyboard, or the first version of it anyway, and that meant it was my turn to take that and turn it into an animatic.
Here's what I had to work with, given to me by Tea.
Then Oscar provided a sound file and I was also told that the glow on the character should be gold, not blue. So here's what I made.
Which everyone was happy with at the time. We knew that the spirit world was too vague, but that was okay for the time being, we'd figure it out eventually.
Since the animatic was done it was time to film. We all headed round to Oscar's place with my camera, set up in his Dad's room and started filming. I acted as camera man with Oscar as the actor and Tea, Jo, and Adrian helping set up lighting and figure out shots. I put my camera on a kitchen tray for a little stabilization. We checked out the footage and realised that my camera wasn't getting the results we wanted, so Oscar biked in to school, got one of their cameras, biked back and we started shooting again. This time the footage looked awesome so we wrapped up. Here are some photos ( mostly from Tea's blog) of the wonderful event.
Good times with the crew.
After our first break we realised that we really needed to sort out the spirit world shots so Tea worked on some new storyboards and I started some new animatic. I used the backgrounds and large creature that Adrian was working on and the smaller creature that Jo was working on, and I went from there. I had to paint a few assets in photoshop, just the Oscar spirit and the low angle shot of the tree, and then I put it all into after effects and made the camera moves and compositing and effects, etc.
It still didn't really have an ending but it was getting closer. We had a group progress report and were told that we needed to sort out the spirit world better so we all sat down and discussed it, I sketched the ideas into a quick storyboard
which Tea took away and started to refine into this
Which looked waaaay better. Sooo, once again I was tasked with updating the animatic.
Here's the first version, still missing most of the end.
And then Keat helped us think of a couple other possible shot compositions to make things more interesting. I jumped into photoshop and did some new elements for the animatic like this here.
I also blocked out some rough movement for the creature etc etc, and created this.
It was getting a lot close to the sort of thing we were aiming for but not quite. Tea came up with a couple other shot ideas and I put in all of our footage, then we had this.
Which was almost there! The team was pretty happy with it, even Dane liked it, but Keat wanted it to go further, so since at this point I'd gone multiple nights without sleep and still had a tonne of 3D to do, Keat split up the shots between Jo, Tea, and Adrian to polish up and put into the animatic while moved on, and here's what the came up with. (you'll have to forgive the echoing sound, I didn't composite this one but I think two versions were overlaid and they forgot to mute one)
I have to say it hurts a little to see weeks of work largely overwritten, but I think the layout looks better for it. In the end we managed to come up with the shot compositions as a team and shared the work around more and I think it's cool that all of our voices and styles are coming across in the film.
So after all of that it was back into 3D for me. There was still a lot to do.
The face was still warped and I decided the first thing to do was fix it, so at school Oscar and I grabbed a camera and tripod and took some nicer reference photos.
We took those from about five meters away with a zoom lens to minimise the warping and made sure that the camera stayed stationary to keep the same angle. These ended up being perfect. I loaded them into the same Maya project and adjusted it all and I managed to get it looking like this.
And if I dare say so myself, looks quite a bit like Oscar, but it gets even eerier when you add hair and a stache.
Those are just extra objects I made to stand in until I got some actual hair sim going.
Next I did a quick UV map using the automatic mapping option in maya and cleaned up a couple areas (id din't have to be nice since my textures are all proceedurally generated in Maya) and applied the texture from my sim tests. I also checked out some hair simulation tutorials and replaced the hair objects with actual maya hair. Then I did a turntable, so lets check that out shall we?
Again it's kinda eerie. I still need to make his beard but I'll get round to that eventually.
Next it was time to rig the thing. Otherwise known as hell.
I had yet more tutorials to check out for this. One for basic rigging and skinning, the other for muscles.
First I made a basic bone setup.
Then I had to make some weight paint it.
Then I tried moving it, but I found that even though the deformations were smooth, there was some collapsing around the shoulders and legs.
So I decided to try my hand at a muscle rig. My freaking mistake. I Found a muscle tutorial and set about it. I did a quick test to figure out how muscle worked.
And I was like yeh I get it. ONWARDS TO GLORY!!
It took a few tries, and about a week, and honestly I can't be bothered looking through it all for progress pictures, but here's what I ended up with.
Which looks cool right? I turned all of my joints into muscle bones, built rib and pelvis deformers from nurbs objects, had to rewight the bones to the skin (there's a tool to do it automatically but it didn't work for me, the first sign of the horrible events to follow.) then built the muscles, sculpted their squash and stretch poses, mirrored those poses maually, and checked that they all moved the way I waqnted them to. It all looked like it was going so well, but when I went to bind the muscles to the skin...
Apparently I did some stuff wrong, and got shoulders McGee. When I add the muscles it assume that they already have a pose and then I paint the weight and hell breaks loose. Too bad so sad. And thus I abandoned the muscle rig after many failures and many sleepless nights spent working and crying. And so life goes.
So I went back to my original muscleless rig. I figued if I was subtle enough with my animation then there wouldn't be any collapsing. I just can't lift the arms or legs too high. Otherwise the deformations are all acceptable. It's just too bad that I won't be quite so free when I animate.
Then I built the controls, that didn't take too long, just some nurbs curves and constraints.
Blammo. Then I did the rig test.
It's a bit short but I think the movement matches the kind of thing that'll be in the final film so I'm happy that the rig should be sufficient.
So that's pretty much everything. There's probably a bunch of little bits and pieces that I did to figure this stuff out, various scribblings in books and such. All the stuff that would be on here if I just updated as often as I'm meant to. As I said I've just been working too hard to even think about blogging. It's been intense. Next up, blocking out the actual shots in 3D and then animating. Then I can get to simulation and rendering. Should be very interesting indeed.
I'll try be at least a bit more onto it with these blogs, so hopefully I'll be back soon with more.
Untill then, stay healthy, and sleep more than I do.